Showing posts with label Children. Show all posts

Monday, December 23, 2013

Christmas Sewing

I didn't have very much Christmas sewing this year, which I am thankful for, it was a very calm month. (And we succeeded at finishing our Christmas Shopping BEFORE Thanksgiving for the 2nd year in a row!) But I did make a few small items.

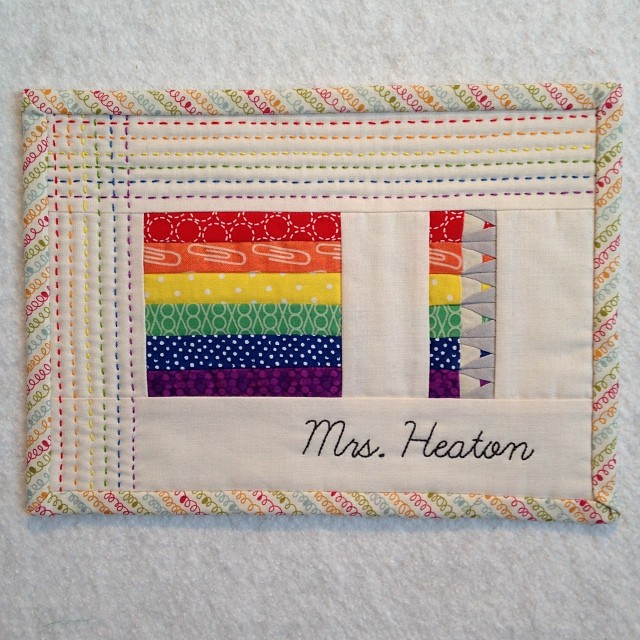
First up is a lovely little mug rug I made for Miss K's kindergarten teacher. I've never done a teacher gift before, but I imagine a teacher gets a lot of similar items each year - and she probably got multiples of what we bought at the store for her, so I wanted to make something more personal.
Mrs Heaton Mug Rug
I adapted the Vintage Pencil Case pattern that is in the Winter 2014 issue of Modern Patchwork Magazine. The pattern only had 5 pencils, but I wanted to complete the rainbow so I added a 6th and widened the borders allowing for the stitching.  The rainbow quilting inspiration came from Me and My Sisters Designs
IMG_3329
My girls have asked Santa for American Girl dolls (Miss B for a sweet Bitty Baby with yellow hair and green eyes. Miss K for an American Girl doll that is just like her with glasses and earrings, who loves horses just like she does.) I've got an in with the big guy, so I went ahead and made some little quilts to keep the dolls warm. 
Miss B LOVES cat's (if she's not asking for a baby sister she is asking for a "kit-lin"), when Elizabeth @ Oh, Fannson! announced her Catvent-Quilt-Along I knew I  needed to make one for B. Of course I gave up after a few blocks, then added in some more solid faces, and made a lovely little mini. I used B's favorite colors, and she is super excited about it. I FMQ it with echoing flowers. Final measurements are 18" x 24.5" big enough she could wrap her bitty baby up. 
Untitled
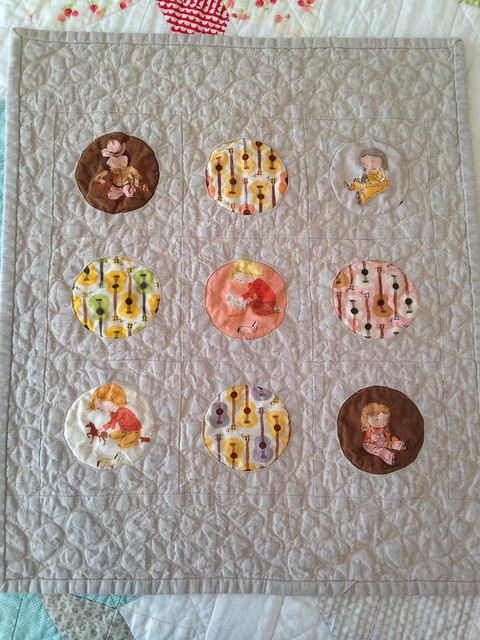
I also had a lot of fun with Miss K's quilt. She LOVES horses (For her birthday this year she asked for a roller skating horse. Thankfully Build-a-Bear was able to come through with that one!) and guitars. She already has a library tote featuring Heather Ross' Far Far Away II cute little girl playing with horses, and I was able to get my hands on a bundle of all of the horse prints and coordinating guitars. Seriously if there was ever a fabric created just for one little girl it was this line!
While I was waiting for my Heather Ross fabric to arrive I came across THIS awesome piec-lique tutorial by Cristy @ Sew Much Like Mom. Seriously go check it out! Life changing! I couldn't wait to try out circles, so I decided to go for it with Miss K's quilt. My circles started out at about 3" diameter, but between the linen in the Heather Ross fabric and the Essex linen I used for the background, the quilt experienced a TON of shrinkage! I got daring and FMQ pebbles in the background! The texture of this quilt is just glorious. And she LOVES it! Thankfully I have a lot more fabric left to make one her size. This quilt finished at 15" x 17.5" a bit smaller than I'd hoped, but hopefully her doll will still stay warm. 
Untitled
Besides these projects I've been working on my red and white Double Irish Chain, in hopes of getting it done before my husband deploys (eek! that is coming too soon!) and I've taken up cross stitch, but it'll be a really long time before I have any finishes to show you in that department. 
Monday, December 17, 2012

Bear Carriers!

I've had the Oliver + S Book for over a year now, and up to this point have only made the Red Riding Hood cape, though I've been wanting to make the bear carrier since I purchased the book. I finally got around to it!
Oliver + S bear carrier
They were supposed to be Christmas presents, but when it came time to put the velcro on the straps I realized the easiest way to measure them would be to put them on my girls. So they got them a week early.
Oliver + S bear carrier
They love them! I made the straps with 3 velcro attachments so they can grow with them, plus a little extra just in case. The girls picked their own fabric out of my stash a few weeks ago, not knowing what it would be for. B (the shorter one) went for the little lamb fabric, but then her lovey is a lamp named Bo. K (the cutie in the glasses) spent a lot of time deliberating and matching and finally settled on the magenta coffee bean print and the blue print, I added the orange for another pop of color. 

And because my brain had issues wrapping around how exactly the straps work, because I am a visual person (and I should have realized from my own babywearing experience)- for you: the straps cross in the back, which is cute and secure for the stuffed animal. 
Oliver + S bear carrier
And what would have been most helpful to me, the straps come up between the stuffed animals legs, behind them, button to the body of the carrier, and then over your child's shoulders. Of course this is easy to figure out if you just sew the buttons on when they tell you to. But who reads instructions? Not me.
Oliver + S bear carrier
The pocket is pretty pointless. I wouldn't waste my time on it next time. Just pick a cute print or put an applique or embroider their name on it, you can't even fit a Cabbage Patch doll bottle in their or anything that a child might want to tote around with their baby. (B was resourceful and just tucked her bottle in with the her lamb. She also quickly learned the babywearer trick of using the potty while wearing a baby. I wish I had learned that trick much earlier on. ;) )

Saturday, December 8, 2012

Neverland Pirates!

Sorry I've been so quiet lately, I've just been busy working away on projects and not taking much time to sit down at the computer.
I do have a finish to share!
My 2.5 yo daughter is in LOVE with Jake & the Neverland Pirates. She declares she is going to marry Jake, and sleeps with a plush doll, calls everything she does "Neverland Pirates...*fill in the blank*" - such as "Neverland Pirate boots" and "Neverland Pirate noodles". She renamed her beloved stuffed lamb Bo "Izzy" after the girl on the show. Seriously OBSESSED!
I've had a sweet little bundle of Sarah Jane's Out to Sea girly colorway sitting around since it was released, never sure what I was going to do with it. When my daughter discovered the pirate girls fabric she fell in love with the "Neverland Pirate fabric" and demanded a "Neverland Pirate quilt", so I set to work on something quick any easy (because really, who has time to just throw together a quilt during December? {ok, apparently I do, because I just took on 2 custom orders, though only one if for Christmas}). Without further ado - the Neverland Pirates quilt:
"Neverland Pirates"
I took a ton of 3" squares and just went to town.
I pieced 4-patch blocks, then joined them into rows, then sewed the rows together.
The beginning was tedious and then it went really quick. 
Neverland Pirates
I had planned on appliqueing a bunch of hexies on the front - from the ships and pirates and mermaid prints, but when I went to do that it just didn't look as cute anymore, so I only added one, Jane, the captain.
Neverland Pirate back
I had enough of that cute narwhal print for the whole backing,
but I wanted to include so of that "Neverland Pirate girls" so I pieced the back.
I quilted with a wavy line - did you know you can do that with a walking foot?
I just learned that a couple of weeks ago, it's my new favorite!
My daughter is very happy with her new quilt. Now I'm just hoping I can get a pink stuffed narwal form Mochi Studios before Christmas.

Friday, October 26, 2012

Quilt Feature: Hopscotch

{Edited, because I changed my mind...again...sigh. My official entry for the Blogger Quilt Festival is Drunk Zebra after all. I wish I hadn't changed it. Now I'm much further down the quickly growing list of wonderful quilts.}
This is Katy's Hopscotch Quilt. This quilt was made for my oldest daughter's 4th birthday. A lot of love went into it, and though it is impossible to tell from this first photo, a lot of detail.
It was a very improvisational quilt. I knew what I wanted the hopscotch part to look like, but assumed I'd end up with a throw quilt.
I hand appliqued the numbers using my favorite freezer paper method, and then pieced borders for each square. It was very long and skinny at that point so I added width with more white fabric, but it was so empty and white. Thanks to the suggestion of some fellow quilting friends, that baren wasteland was resolved with "doodles"!
A long with a lot of raw edge applique (in which I made up my own technique - using perle cotton and doing a running/quilting stitch to stitch down the appliques), I did a lot of hand quilting with perle cotton to look like chalk doodles surrounding the hopscotch.
I doodled a house, just like I've been drawing them since elementary school.
I used stenciles for things like flowers and stars. My wonderful husband, who is a little more talented with a pencil than I, helped out by doodling a butterfly and a bee.
My favorite doodle is our stick figure family. Here are some more doodles, you can see these photos better on Flickr. They are really striking in person, but stinkin' hard to photograph!
 Prior to the doodle appliques and hand quilting, I machine quilted the entire quilt, using a walking fit on my domestic machine, with a random grid, giving the quilt a beautiful texture.
The appliques include stars, hearts and flowers, as well as a sun, and Katy's 4 year old sized hands. 
The finishing touch was a personalized label.

I used Oliver + S Modern Workshop fabric, which is wonderful for a not very girly-girl, her favorite color is blue. I backed it with a blue flannel from Moda, which makes it oh so cozy.
Katy loves her quilt, and regularly plays hopscotch on her bed, though sometimes we pull it down to the family room for some fun.

Friday, July 13, 2012

Hopscotch!

Katy's Hopscotch Quilt
It finished around 64" x 90", so kind of a skinny twin. It was made with Modern Workshop by Oliver + S for Moda, backed with a Moda flannel that was a perfect shade of blue, which you can see in the last photo.
The numbers are properly appliqued with my typical freezer paper technique, but all of the applique outside the hopscotch are raw edge, stitched on with perle cotton (which I should have though about more, after washing some of the fraying went to far and I had to do some more stitching to secure them down, but it's cute). 
I was inspired by a few quilts I saw on pinterest, but when it came down to it, I just made it up as I went, and figured it would end up a fun throw Katy could toss out on the floor and play on. Now she can play hopscotch on her bed instead. =) She LOVES it by the way.
Katy's 4 year old handprints, below them, though hard to see is our family...
Our stick figure family 
The "label" She loves that her name is on it.

Thursday, January 19, 2012

Quite Contrary (and Bricks)

Quite Contrary
47" x 58"
Fabric: Quite Contrary by My Mind's Eye for Riley Blake Designs + a really cute green with white polka dots  =)

This is the same pattern as the "Sophia" quilt I made for my niece, but I used larger triangles this time and quilted it a bit differently. 

Quite Contrary can be purchased HERE for $225 

Ok, so I got 2 quilts done this week....
This one is more simple and shall be named "Bricks". It was made with Punctuation by American Jane for Moda. It is 30"x 31" and I think would be a fun baby quilt for either gender. This quilt can be purchased here for $60.  


Tuesday, October 11, 2011

Halloween Costumes! Red Riding Hood

Sorry just crappy phone pictures for now

Red Riding Hood cape, from the Oliver + S book


Peasant Dress (found here) and Apron (found here)
09 10 11 12
Blogging tips